Unveiling the Thriller: Understanding "Non-public" in Outlook Calendar
Associated Articles: Unveiling the Thriller: Understanding "Non-public" in Outlook Calendar
Introduction
With nice pleasure, we’ll discover the intriguing subject associated to Unveiling the Thriller: Understanding "Non-public" in Outlook Calendar. Let’s weave fascinating data and supply contemporary views to the readers.
Desk of Content material
Unveiling the Thriller: Understanding "Non-public" in Outlook Calendar

Microsoft Outlook’s calendar performance is a cornerstone of productiveness for thousands and thousands. Its energy lies not solely in scheduling appointments and conferences but in addition in managing the visibility and privateness of these occasions. One key function typically misunderstood is the "Non-public" setting. This text delves deep into the which means of "Non-public" in Outlook calendar, exploring its implications for sharing, visibility, and general calendar administration. We’ll study the way it differs from different privateness settings, talk about its sensible functions, and troubleshoot frequent points related to its use.
What Does "Non-public" Truly Imply?
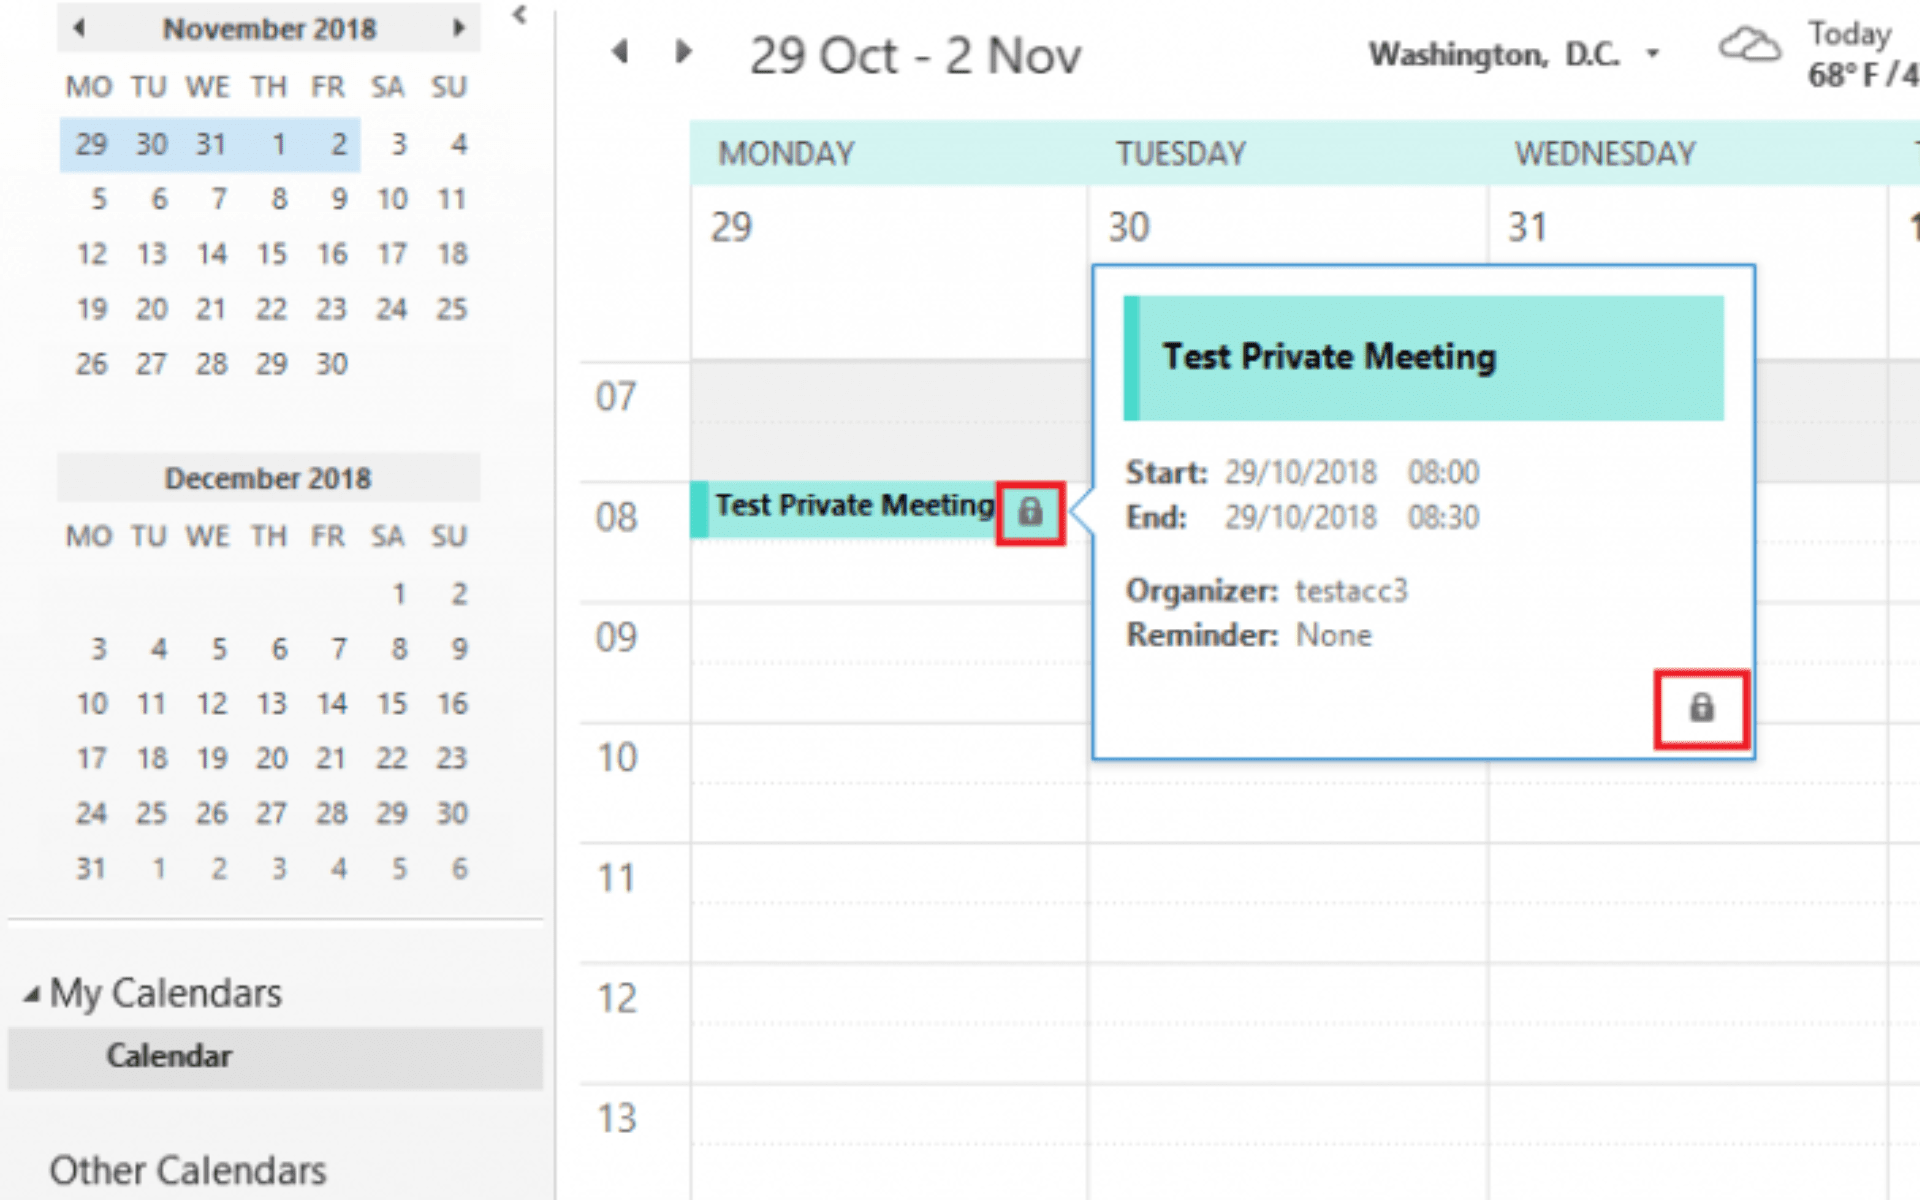
While you mark an occasion as "Non-public" in your Outlook calendar, you are primarily making a degree of confidentiality. This does not imply the occasion is totally hidden from everybody; moderately, it controls how the occasion’s particulars are exhibited to others who would possibly entry your calendar.
Particularly, marking an occasion as "Non-public" hides the topic, time, and placement from others who view your calendar, even these with delegated entry or sharing permissions. They are going to see a blocked-off time slot indicating an occasion is scheduled, however the specifics stay hid. This prevents pointless publicity of private or delicate data.
The Distinction Between "Non-public" and Different Privateness Settings:
It is essential to grasp that "Non-public" is distinct from different privateness controls in Outlook. Whereas it impacts the visibility of occasion particulars, it would not dictate who can entry your calendar within the first place. Different settings, like calendar sharing permissions, decide who can see your calendar in any respect. "Non-public" works inside these permissions; it is a further layer of management.
Contemplate this analogy: Think about your calendar as a home. Sharing permissions are just like the locks in your doorways – they decide who may even enter the home. The "Non-public" setting is like inserting sure rooms off-limits inside the home. Somebody may be allowed inside (have entry to your calendar), however they will not be capable to see every little thing inside these personal rooms (personal occasions).
Sensible Purposes of the "Non-public" Setting:
The "Non-public" operate proves invaluable in numerous eventualities:
-
Private Appointments: Physician’s appointments, remedy periods, private errands, and different personal engagements profit from this setting. You’ll be able to preserve your schedule’s group with out revealing delicate particulars to colleagues or members of the family.
-
Confidential Conferences: Inner discussions involving strategic planning, delicate personnel issues, or monetary data needs to be marked as personal to make sure confidentiality inside your group.
-
Time Blocking for Focus: Even with no particular appointment, you would possibly use "Non-public" to dam out time for targeted work. This alerts to others that you just’re unavailable, with out revealing the character of your duties.
-
Defending Delicate Data: Conferences with purchasers containing confidential data, or occasions involving private particulars like addresses or cellphone numbers, needs to be marked personal to stop unintentional disclosure.
-
Sustaining Skilled Boundaries: Setting boundaries is essential, particularly in skilled environments. Marking private appointments as personal helps preserve a wholesome work-life steadiness and prevents undesirable inquiries.
Learn how to Mark an Occasion as Non-public in Outlook:
The method of marking an occasion as personal is simple:
-
Create or open the occasion: In your Outlook calendar, create a brand new occasion or open an present one you want to make personal.
-
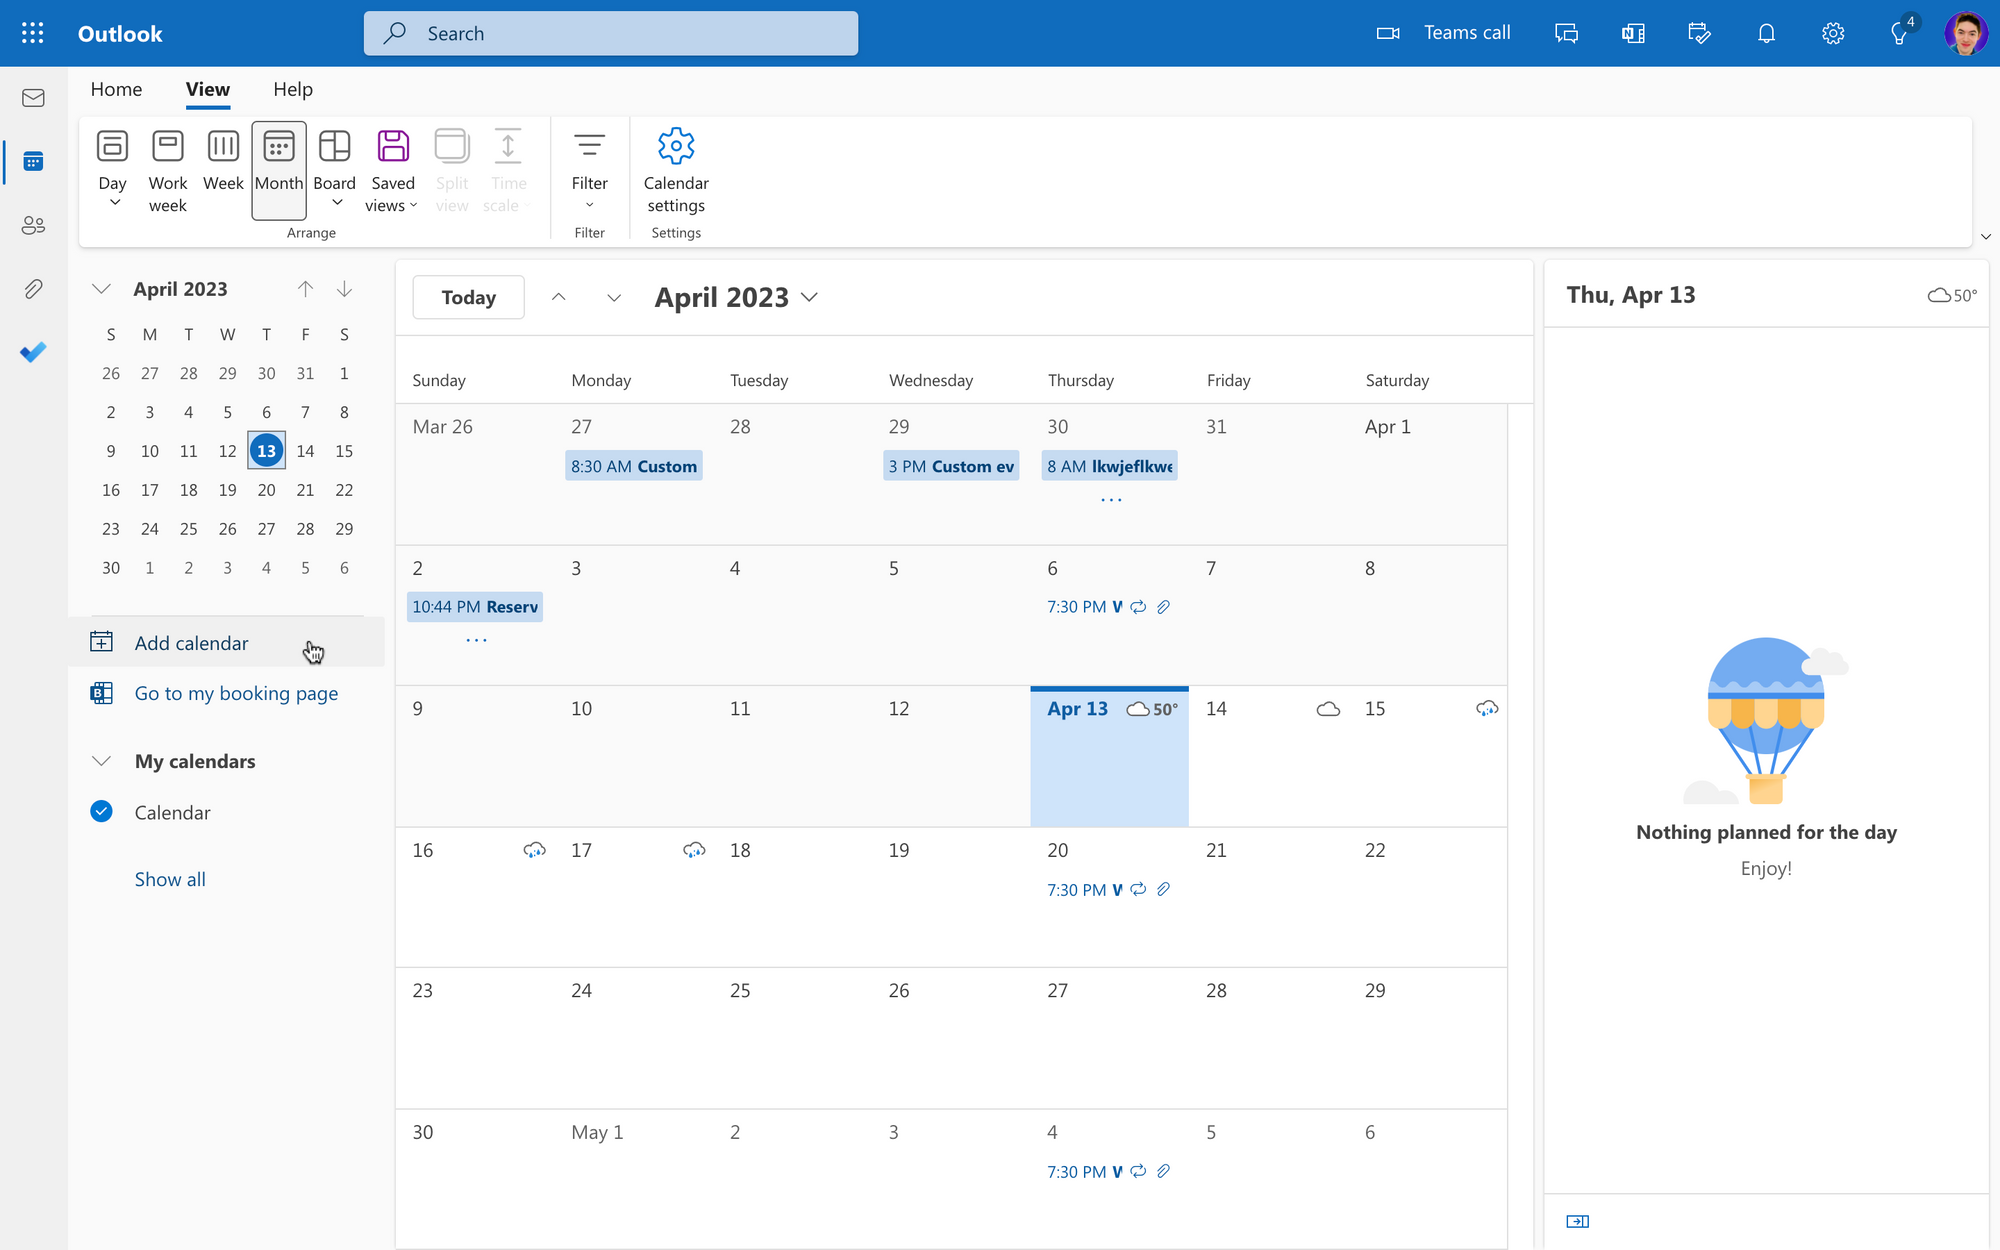
Find the "Non-public" possibility: The precise location would possibly differ barely relying in your Outlook model (desktop, net, cell), however you will typically discover a checkbox or toggle labeled "Non-public" throughout the occasion’s settings. It is typically situated close to different choices like reminders and attendees.
-
Examine the "Non-public" field: Choose the checkbox or toggle to mark the occasion as personal.
-
Save the adjustments: Save the occasion to use the "Non-public" setting.
Troubleshooting Widespread Points with the "Non-public" Setting:
Whereas typically simple, some points would possibly come up:
-
Delegated Entry: In the event you’ve delegated entry to your calendar to an assistant or colleague, they could nonetheless see some details about personal occasions, relying on the extent of entry granted. Rigorously evaluation delegated entry permissions to make sure they align together with your desired degree of privateness.
-
Shared Calendars: The "Non-public" setting solely impacts the visibility of the occasion inside your calendar. In the event you’ve shared your calendar with others, they are going to nonetheless see the blocked-off time slot, even when the small print are hidden. Contemplate rigorously who you share your calendar with.
-
Outlook Model Discrepancies: The precise location and performance of the "Non-public" setting would possibly differ barely between Outlook variations (desktop, net, cell). Seek the advice of your particular Outlook assist documentation in the event you encounter difficulties.
-
Conflicting Permissions: If in case you have conflicting sharing permissions or delegated entry settings, the "Non-public" setting may not operate as anticipated. Evaluate and regulate these settings to make sure consistency.
-
Free/Busy Data: Even with the "Non-public" setting enabled, your free/busy data would possibly nonetheless be seen to others relying in your group’s settings and your sharing permissions. It is a separate setting from the occasion particulars privateness.
Past the "Non-public" Setting: Additional Enhancing Calendar Privateness:
Whereas the "Non-public" setting is a helpful device, it is only one piece of the privateness puzzle. Contemplate these further steps to bolster your calendar’s confidentiality:
-
Prohibit Calendar Sharing: Rigorously handle who you share your calendar with. Keep away from sharing it unnecessarily with people who do not require entry.
-
Make the most of Delegated Entry Rigorously: When granting delegated entry, specify the extent of entry granted. Prohibit entry to solely the mandatory data.
-
Frequently Evaluate Permissions: Periodically evaluation your calendar sharing and delegated entry settings to make sure they nonetheless align together with your wants and privateness preferences.
-
Password Safety: Guarantee your Outlook account is protected with a powerful, distinctive password.
-
Two-Issue Authentication: Allow two-factor authentication for an additional layer of safety.
Conclusion:
The "Non-public" setting in Outlook calendar is a robust device for managing the visibility of your appointments and conferences. Understanding its performance and limitations is essential for sustaining your privateness and defending delicate data. By combining the "Non-public" setting with cautious administration of sharing permissions and different safety measures, you possibly can successfully management the accessibility of your calendar knowledge, guaranteeing a steadiness between group and confidentiality. Keep in mind to recurrently evaluation your settings and adapt them as your wants evolve. This proactive method will guarantee your Outlook calendar stays a productive and safe device for managing your schedule.


![Cómo Hacer que el Calendario de Outlook Sea Privado [Paso a Paso]](https://windowsreport.com/wp-content/uploads/2020/01/the-Private-option.png)


Closure
Thus, we hope this text has supplied helpful insights into Unveiling the Thriller: Understanding "Non-public" in Outlook Calendar. We thanks for taking the time to learn this text. See you in our subsequent article!